How to Merge Arrays or Arrays of Objects in JavaScript

How to merge arrays or arrays of objects in javascript

Here are multiple ways to join array of objects. First, let us see how to use different techniques to merge multiple arrays in JavaScript.

The Spread syntax (…)

If you would like to use all the elements of an array of objects to be included in a list use Spread syntax to combine two or more arrays. Introduced in ES6, this is helpful in creating new array literals.

How to use spread operator in JavaScript

let array1 = [1,2,3];
let array2 = [4,5,6];
let array3 = [];
array3= […array1, …array2];

Lets see how to use spread syntax with set.

Set is an in-built collection, it does not accommodate duplicates, unlike concat. Therefore, this is more useful when you would like to build a collection of arrays minus duplicates.

let array1 = ['1','2','3']
let array2 = ['3','3','4','5'];
let array3 = [];
array3 = [...new Set([...array1,...array2])];

How to use spread syntax with push method

We will see next how to use push syntax separately. But, for now, let’s see how to combine Spread syntax with the push method.

let array1 = [1,2,3,4,5];
let array2 = [6,7,8,9,10];
let array3 = [];
array3.push(...array1, ...array2);

How to use spread syntax with Array.of()

The Array.of() method creates a new Array instance from the arguments.

let array1 = [1,2,3,4]
let array2 = [5,6,7,8];
let array3 = Array.of(...array2, ...array1);

Merge array or merge objects with the reduce() method

The reduce() function, reduces the entire Array into a single value, by executing the function provided by us.

let array1 = [1,2,3,4];
let array2 = [5,6,7,8];

let array3 = array2.reduce((accumulator, currentValue) => {
          array1.push(currentValue);
          return array1;
}, array2);

OR

let array1 = [1,2,3,4];
let array2 = [5,6,7,8];
let array3 = array2.reduce(function (accumulator, currentValue) {
          array1.push(currentValue);
          return array1;
}, array2 );

There are various parameters associated with reduce method. This document explains very well how it works.

Merge array or merge objects with the concat() method

The concat() method will combine two or more arrays to produce the third array.

let array1 = [1, 2, 3];
let array2 = ['d', 'e', 'f'];
let array3 = array1.concat(array2);

Merge array or merge objects with the push() Method

The Push() method, generally is used to append the item to the end of an array and not really “combine array” like those methods as seen earlier. The general way to add elements to an array is as follows:

let array1 = [1, 2, 3, 4];
array1.push(5, 6, 7, 8);

The workaround to combine two arrays with push(), is to use apply() method. The apply() method calls a function with a given value and arguments provided as an array (or an array-like object ).

let array1 = [1,2,3,4];
let array2 = [5,6,7,8];

Array.prototype.push.apply(array1 , array2 );

console.log(array1);

Merge array or merge objects with the for() Loop

Let’s see the common way to combine two arrays using for loop in javascript

function combine(sourceArray, destinationArray) {
     for(let i = 0, len = sourceArray.length; i < len; i++) {
            destinationArray.push(sourceArray[i]);
     }
      return destinationArray;
}

let array1 = [1,2,3,4];
let array2= [5,6,7,8];
let array3 = [];
combine(array1, array3);
combine(array2, array3);

If you would like to specify any other methods, feel free to help others by commenting below.

Convert Editable DIV into a Text Field

convert div element into a textfield or textarea

Convert Editable DIV into a Text Field

Using an enumerated HTML attribute called contentEditable, you can turn an HTML div element into an editable textbox or textarea.

Make an editable div look like a textfield

<html>
  <div contenteditable="true"></div>
</html>

Make an editable div look like a textarea

<html>
  <div contenteditable="true"></div>
</html>
<style>
div {
    -moz-appearance: textfield-multiline;
    -webkit-appearance: textarea;
     resize: both;
     height: 30px;
     box-shadow: inset 0px 1px 2px #666;
}
</style>

When we call the contentEditable and assign to ‘true’, the document.execCommand() method is made available and the browser modifies its widgets to allow editing DOM element.

We would be using this, in a scenario where you would need to create an excel-like application or building data entry apps, etc.

Demo

New rich snippet testing tool by Google

new structured data testing tool

New rich snippet testing tool by Google

Google sunsets its structured data testing tool. The new tool will be now called the “New Google Rich Results Test Tool”.

Google has launched a new structured data testing tool, in which they will be providing rich results search and similar search experiences.

Google has deprecated the current structured data testing tool and has rolled out notifications on July 07, 2020, to the users about the move to a new Google rich snippet testing tool. Google has also announced that the old tool is still available, but, recommends users to move to a new tool.

Google notification of deprecating structure data testing tool

Rich Results testing tool features

  • It will accurately show which Search feature enhancements are valid for the markup provided.
  • It can render mobile and desktop versions of the result.
  • It can now handle structured data markup effectively that are dynamically loaded.
  • It’s in sync with Search Console reports.
  • Test complete URL or just code snippet.

The Tools returns warnings and errors once you test the URL or code snippet. The error suggests that the code will no longer be eligible for showing them under Rich Results, whereas, warnings would still be considered. We strongly recommend avoiding both of them by fixing the errors and warnings for better ranking opportunities. Here is the guide to fixing them.

Rich Results Test Tool Interface

The Rich Results Test Tool Beta program was launched in 2017. It had limited capabilities to produce rich results, meaning, it was supporting only schema markups like jobs, movies, and recipes.

What are rich results in Google and why should we use them?

new structured data testing tool

Rich Results are experiences on Google Search that are more than just links. Rich Results are the efforts to provide the users with the information beyond text such as image, video, carousels, etc. Rich results are alternative ways to attract traffic to your site beyond links. You can implement rich results by using structured data.

Have you used the tool yet? Let us know in the comment below.

[ratings]

Facebook New Themes

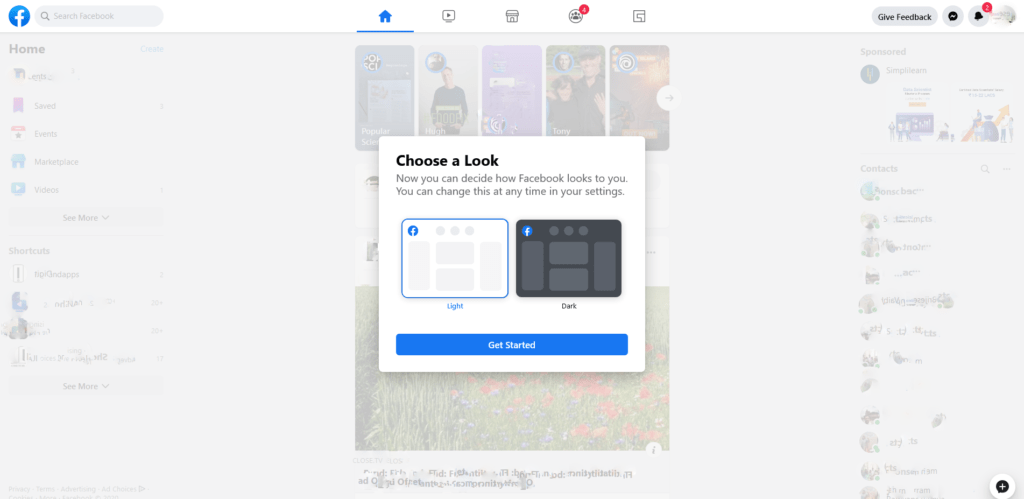
Recently Facebook is pushing to try a new look and feel for its users. Facebook has provided two theme options for users to switch. One is the Facebook light theme and the other is Facebook Dark theme.

Facebook theme options
Facebook offers users to try a new theme
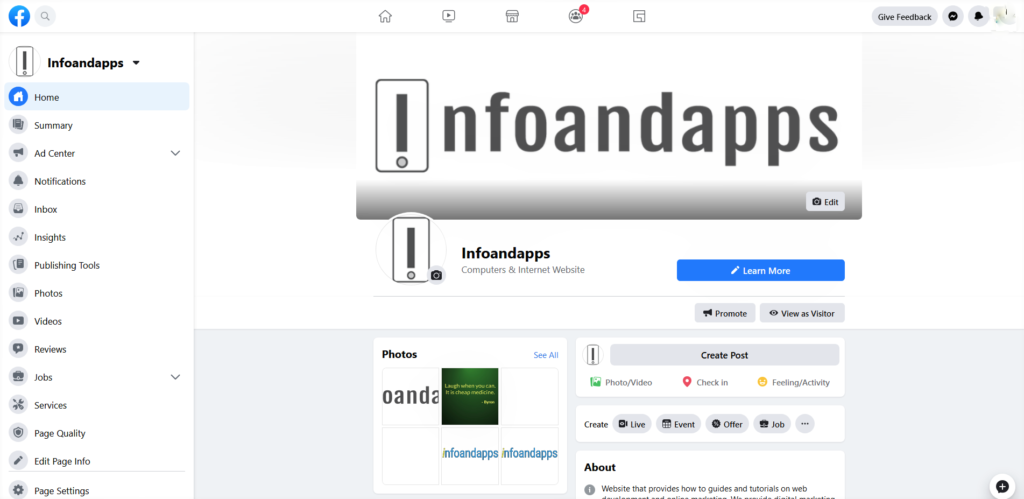
Facebook light theme look and feel
Facebook light theme
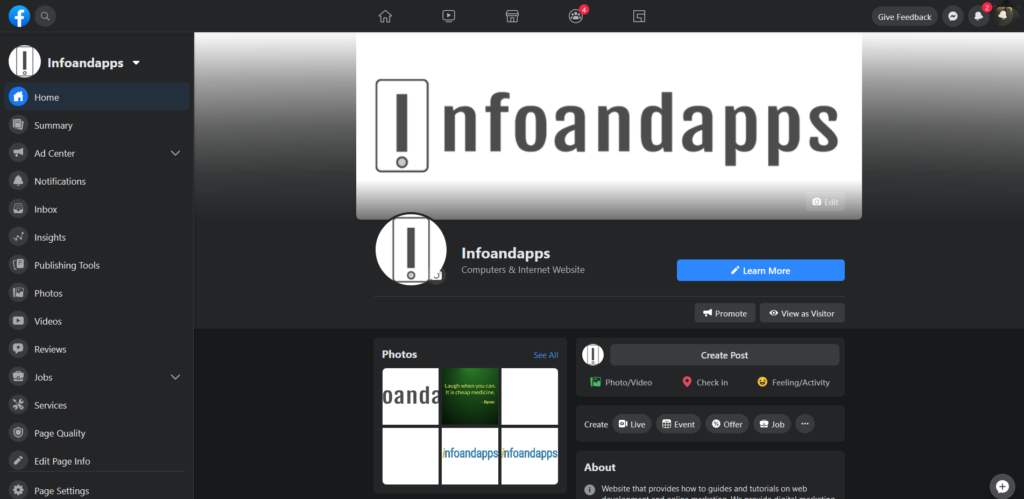
Facebook dark theme look and feel
Facebook dark theme
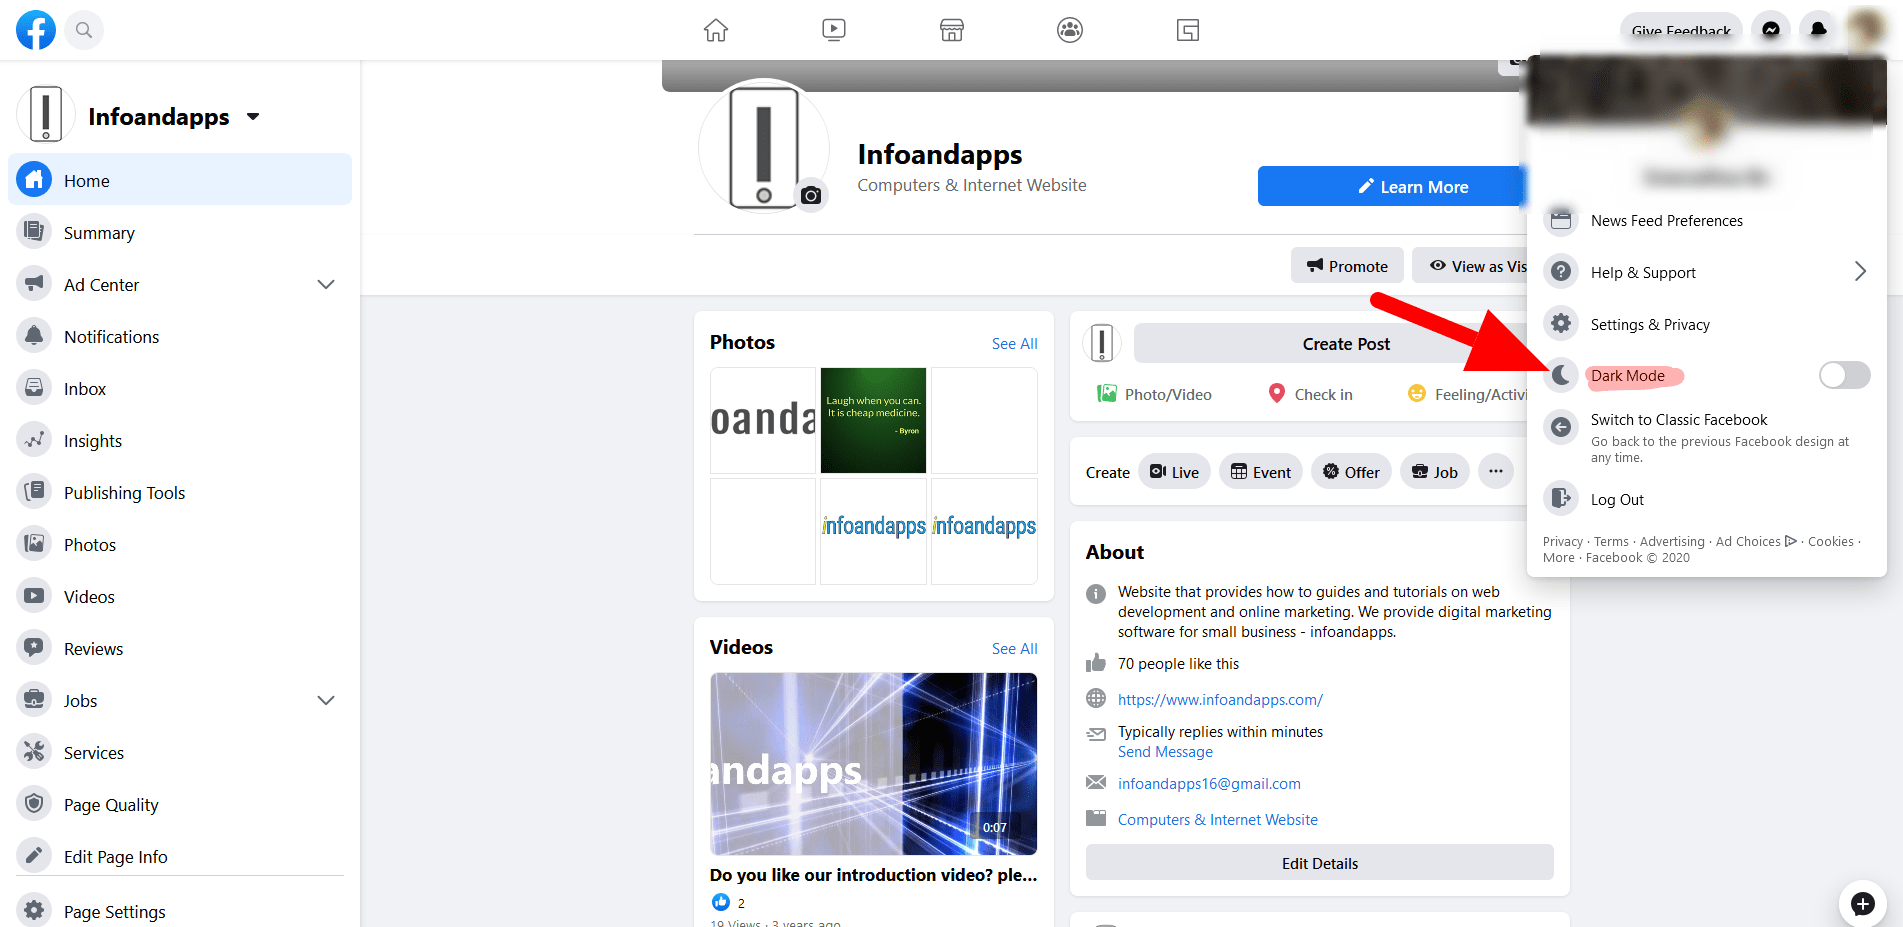
Where to change Facebook theme setting.
Change Facebook theme settings

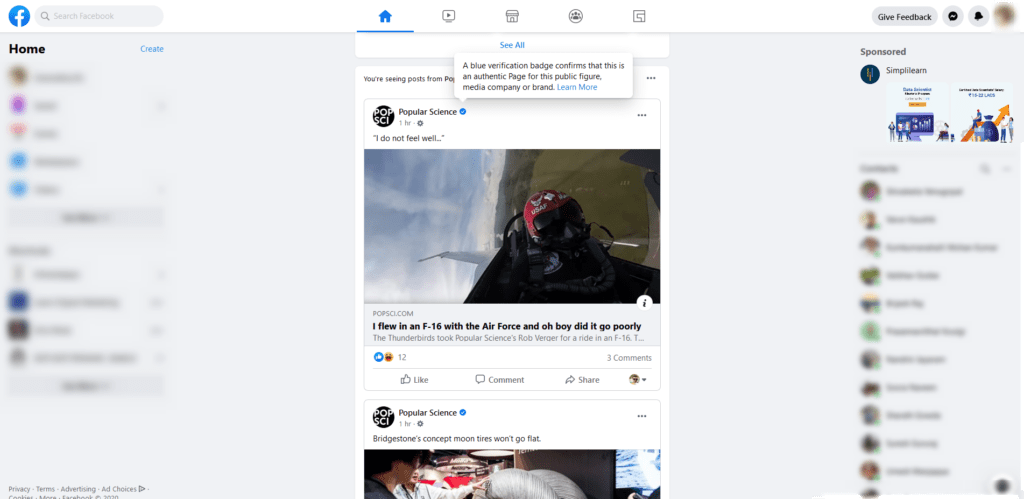
Also, Facebook now clearly tells the user about the page authenticity via the “Facebook blue tick” option next to the page name.

Facebook blue tick to authenticate the pages.
Facebook blue tick for the page authentication

Revolutionize Your Digital Marketing Strategy with These Must-Have Browser Extensions

Must have browser extensions for Digital Marketing

Revolutionize Your Digital Marketing Strategy with These Must-Have Browser Extensions

Browser extensions became an integral part of web developers and now it’s helping Digital marketers to go beyond conventional methods to harness the power of Digital Marketing Tools.

No 8 is our favorite and time saver.

The chrome browser has a definite advantage over firefox. Why? Because Chrome as we know it is the most used browser on the internet and its owned by Google. So, they seamlessly integrate with other Google technologies.

Let’s take a look at some of the best powerful chrome and firefox browser extensions for Digital marketers.

WooRank

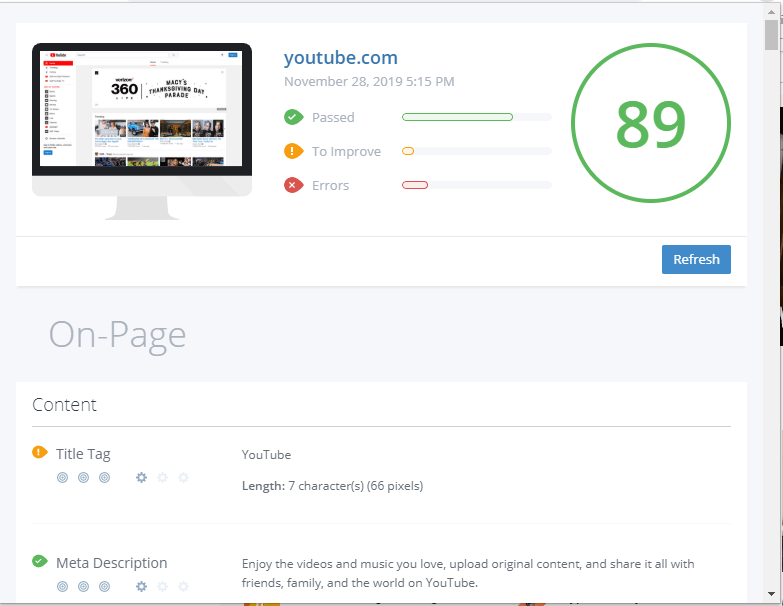
WooRank helps you get a deep analysis of the website. It has the ability to quickly survey the page and provide On-page and Off-page analysis reports.
It analyses the page to give brief useful information on:

On-Page Optimization

  1. Content
  2. Indexing
  3. Mobile analysis
  4. Structured Data
  5. Security
  6. Performance
  7. Technologies
  8. Branding
  9. Domain
WooRank browser extension for Digital Marketers

Off-Page

  1. Backlinks
  2. Traffic source
  3. Google Analytics
  4. Local
  5. Social Profiles
  6. Facebook Insights
Stop visitors from leaving your site!

Of course, you need to signup to get some of the facilities like local and Facebook insights, etc. The WooRank plugin is available for both chrome and firefox browsers.

Grammarly

Grammarly is a digital writing assistant for content writers to correct English grammar and spelling. It allows you to personalize your dictionary and paid version gives you many more options like style-specific writing with a custom dictionary. Its built-in tone feature helps you in writing and maintaining a specific tone.
The Grammarly extension plugin is available for both chrome and firefox browsers.

Keywords Everywhere

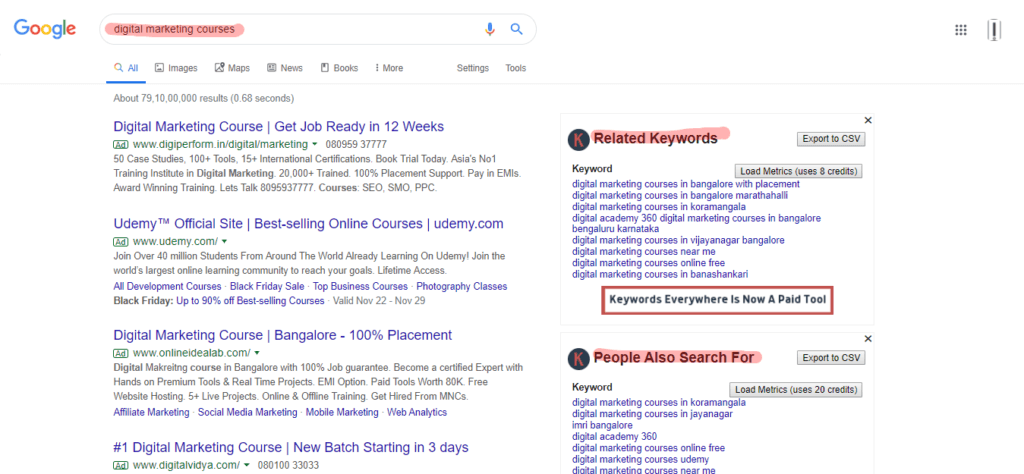
Most popular SEO tool plugin for finding keywords with just a click. It helps you to populate “related keywords” and “people also search for” along with the search word you have used on a search engine. The tool comes with features like bookmarking favorite keywords, importing those keywords, page analysis, stats, and other metrics. You need to signup and get an API key emailed to you from the creators to activate this plugin. From October 1st, 2019, it was made a paid tool to keep the platform running. If you can afford to spend a few dollars., it’s worth going for.

NOTE: A free keyword everywhere alternative chrome extension is available.

Keywords Everywhere extension is available for both chrome and firefox browsers.

keyword everywhere browser extension for SEO and digital marketing

Google Tag Assistant

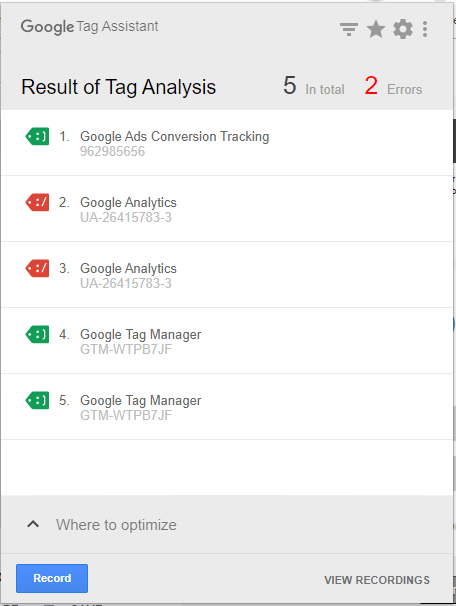
The Google tag assistant will help you to identify the various Google analytics tag used on the website. The Google tag assistant will check for any errors, report back to the user, and give suggestions on the improvements required such as Google Analytics, Adwords Conversion Tracking, Google Tag Manager, Global Site Tag, and more. Use the Google tag assistant to diagnose troubleshoot or validate all the Google Analytics implementations. 
You can also connect the plugin to the Google Analytics account and directly see the metrics within the plugin. 

The red tag icon of Google tag Assistant represents an error in tag implementation.

The green tag icon of Google tag Assistant represents a warning in tag implementation.

The blue tag icon of Google tag Assistant represents all good, on tag implementation.

Google tag assistant browser extension for checking tag implementations

Google Tag Assistant extension is available for both chrome and firefox browsers.

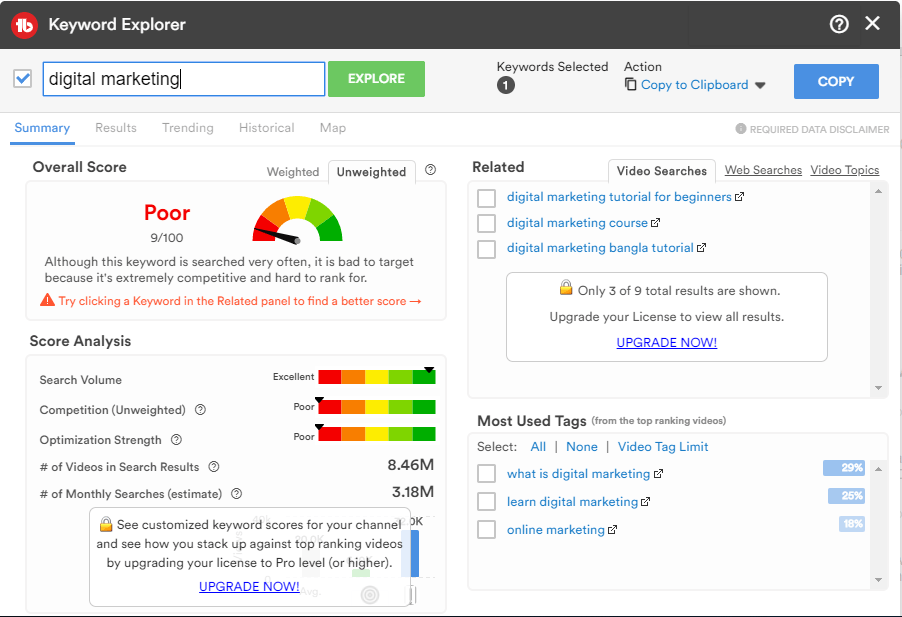
TubeBuddy

This extension helps you to perform YouTube video optimization (video SEO). It also allows you to manage your youtube channel. The extension is free to use and also has a paid account with tons of extra features to customize your SEO for videos. They are also officially Youtube certified.

TubeBuddy browser extension for video digital marketing

TubeBuddy extension is available for both chrome and firefox browsers.

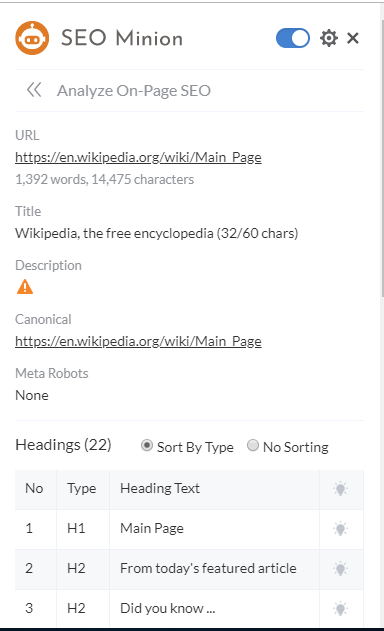
SEO Minion

This beautiful extension helps you in a proper technical SEO audit for a webpage. It’s simple and easy to use. Some of the quick features are the analysis of On-page SEO, Grabbing all the links, and finding the broken links on the page. Check Href implementation, Preview SERP and it also provides a Location simulator. You can check how the result appears for different locations. 

SEO Minion extension is available for both chrome and firefox browsers.

SEO minion browser extension for on page SEO analysis

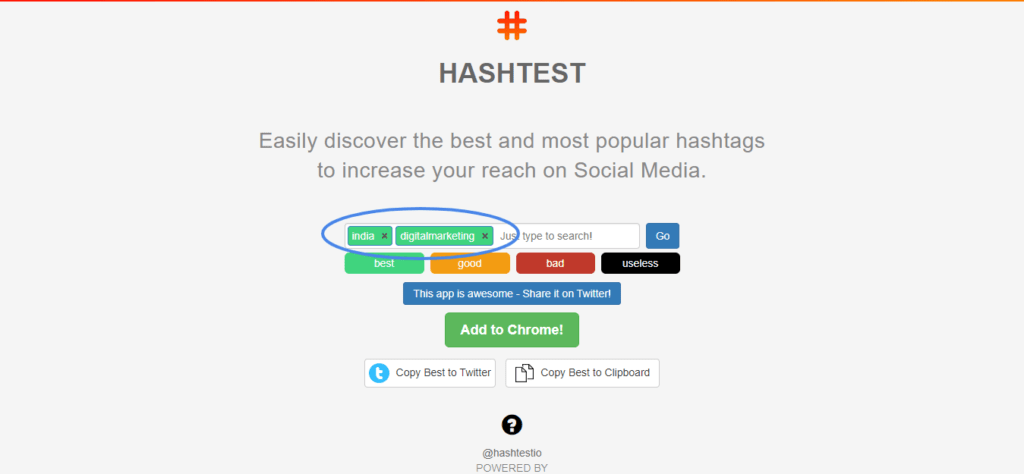
HashTest.io

HashTest is a Hashtag finder among popular social media platforms like Facebook, Instagram, and Twitter. HashTest is useful to know the popularity index of a particular tag that you would like to add to your post before publishing it on the platform. Based on color, determines the popularity green suggests best, orange suggests Good, etc.

HashTest extension is available for both chrome browsers.

browser extension for checking popular social media tags

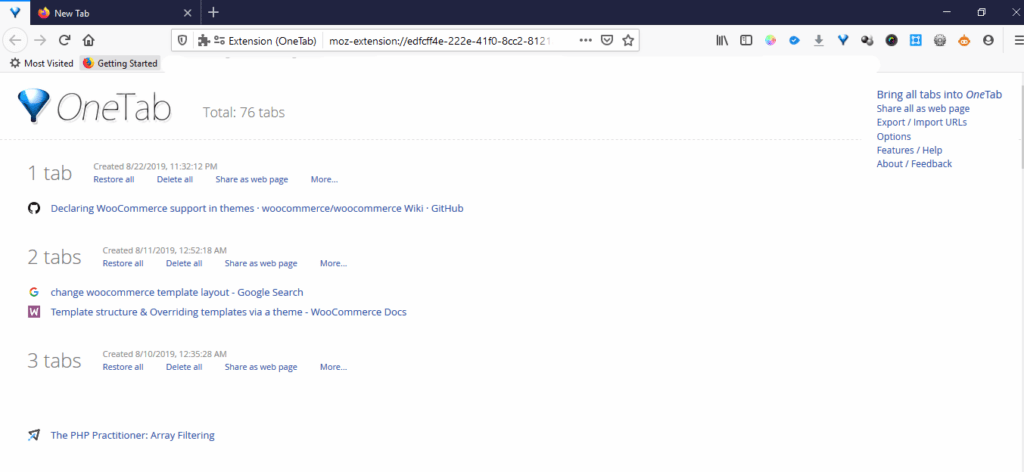
OneTab

As Digital marketers, we need to research different aspects of the topics that we are working with. From reading the latest updates to writing blog posts, we keep working with endless browser tabs. This eventually eats more memory and becomes messy for us to check which tabs were useful and which dint. Well, with OneTab convert all the open tabs into a list. This list will be on the extension until you delete them.

Moreover, it removes the tab clutter and makes your view clear. You can switch back and forth from the list. Also, it gives a nice option to lock the lists and/or import them to a CSV file. 
OneTab extension is available for both chrome and firefox browsers. 

browser extension for maintaining multiple browser tabs

Power Thesaurus

This is a must-have browser extension for content writers. The Power thesaurus gives the most popular synonyms, antonyms, and definitions of any word. Just select the word from your page and right-click the extension to discover the definition and or synonyms for the selected text.

Power Thesaurus plugin is available for both chrome and firefox browsers.

Wappalyzer

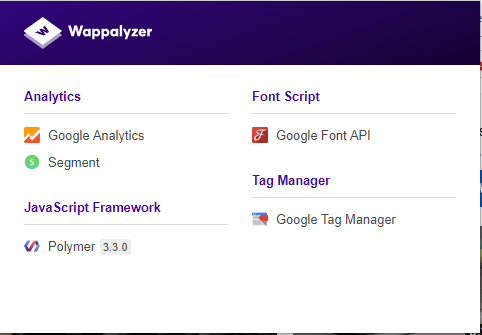
While doing an SEO or competitor analysis or going the extra mile to satisfy the customer on your Digital Marketing service, you need to be ahead in knowing the tools and technologies of any website. The wappalyzer does exactly that for you. Just visit the competitor site and click the Wappalyzer extension. It gives complete details on:

  1. What framework was used
  2. Backend technology
  3. Libraries used
  4. Platform as a service used
  5. Server details
  6. Analytics used
  7. Monetization.
browser extension to check the technologies used for the website
Technologies used in building YouTube according to Wappalyzer

Wappalyzer extension is available for both chrome and firefox browsers.

If you found this useful, then please give thumbs up and share it with others as well. Comment below if you want us to expand this list further.

Simple Script in PHP to Drag and Drop jQuery UI and Store Result in MySQL

Simple Script in PHP to Drag and Drop jQuery UI and Store Result in MySQL

Simple Script in PHP to Drag and Drop jQuery UI and Store Result in MySQL

I was thinking, how much would the drag and drop UI of jQuery help the people in the pure designing aspect? well… found out – not much!, until you use it with a powerful scripting language, what’s better than PHP ?.
Secondly, I thought if you can use PHP, why not a database to store it?. Behold!! here is the simple script in PHP drag and drop the UI and store result in MySQL…

Include jQuery library
Include jQuery UI widget library, especially interactions.

Before we start, I would recommend you to learn this basic Drag & drop tutorial

Basic CSS to style our drag and drop UI

.content_box { 
  padding:5px; 
  width:300px; 
  float:left;
  height:250px; 
  border:#00FFFF solid 1px; 
  font-family:Verdana, Arial, Helvetica, sans-serif;
  margin:10px;
  overflow:auto;
  color:#999999;
  font-size:14px;
}

.content_holder_box{ width:300px;
  float:right;
  height: 250px;
  border:#0099FF solid 1px;
  padding:10px;
  margin:10px;
  color:#999999;
  font-size:14px;
}

.content_holder_box:hover{ 
  border:#0099FF solid 1px; 
}

.dragelement{ 
  padding:5px; 
  margin:3px; 
  width:270px; 
  border:#99FF66 solid 1px;
  background-color:#E2FFC6;
  cursor:move;
  color:#000;
  font-size:13px;
}

.dropper{ width:270px;
  height:125px;
  margin:10px; 
}

.dropper_hover{ 
  border:#999999 dashed 1px; 
  background:url(../images/darrow.jpg) center no-repeat;
}

//you can show arrow image to suggest where user has to drop selected UI.

Create index.php and write a simple drag environment, I have created a static one, you can create a dynamic drag environment, for example, shopping cart elements from the database.

<div class="content_box" id="content_box_drag" onMouseOver="drag();"> Drag label
<?php
for($i=0; $i<5;$i++)
{
    echo "<p class='dragelement' id='dragelement_$i'>Ferrari_$i</p>";
}
?>
</div>
<div class="content_holder_box" id="content_box_drop">Drop here
<p class="dropper"></p>
</div>
<div style="clear:both;"></div>
<br/><br/>
<div id="search_result"></div>

Let’s understand the attributes and HTML structure above

  • id “content_box_drag” is a static draggable environment.
  • initialize drag() function on mouse hover, to prepare the drag UI.
  • create few drag elements from PHP (static).
  • create a dropbox “content_box_drop”, so that users can drop the dragged element into it for selection.
  • create a <p> tag so that we can append the drag element to it.  (you can use any!)
  • use a div to show the result, here “search_result”.

DEMO

jQuery drag and drop function and store the result in MySQL

Stop visitors from leaving your site!
//initialize the drag and drop functions.
function drag() {

$("#content_box_drag p").draggable({
    appendTo: "body",
    helper: "clone",
    revert: "invalid"

    //add comma to previous last line & uncomment this if u want to remove the dropped item
    /*stop: function(){$(this).remove();}*/

});

$("#content_box_drop p").droppable({
    activeClass: "dropper_hover",
    hoverClass: "dropper_hover",
    accept: ":not(.ui-sortable-helper)",
    drop: function (event, ui) {
        var ele = ui.draggable.text();
        $.ajax({
            url: "store.php",
            type: "POST",
            data: {
                element: ele
            },
            beforeSend: function () {
                $('#search_result').html("<center><br/><h4>Loading.....</h4></center>");
            },
            success: function (data) {
                $("#search_result").html(data);
            }
        });
    }
});

}
/**
 * store.php file
 */
<?php

echo "You dropped: <b>". $_REQUEST['element'] ."</b> to Basket";

/**
 * Connect to database and Store this result or do whatever you want with it.
 */

?>

Please note that the idea of this tutorial is to show you how to create things in a simple and understandable way. It does not focus on security and authenticity etc…

Comment below if you need the working demo of this. 🙂

Hope it was helpful, as it was for us, Subscription and Comments are appreciated!!

How do I Enable Navigation Menu in WordPress

How do I Enable Navigation Menu in WordPress

PHP Code to register a header menu to custom WordPress theme

Open functions.php file in your theme and add the following PHP code snippet. If function.php does not exist, create one within the theme folder and add this snippet.

/** 
 * Include primary navigation menu
 */
function themename_nav_init() {
  register_nav_menus( array(
    'menu-1' => 'Primary Menu',
  ) );
}
add_action( 'init', 'themename_nav_init' );
  • themename_nav_init()is an action hook to initiate a call to WordPress function to let you create the menus. Replace “themename_nav_init” with any name suitable for you. But, make sure you use the same name in add_action function.
  • register_nav_menus This function automatically registers custom menu support with options in WordPress. The array parameters passed will help to create location and description. Read more info here on WordPress codex register_nav_menu.

NOTE :

register_nav_menus() allows you to register multiple location . whereas, register_nav_menu() allow you register single location.

  • menu-1” is an ID for which your menu location is allocated, in this case in header “Primary Menu“. It can also be called in the footer or sidebar.
  • add_action( 'init', 'themename_nav_init' ); this will trigger the function on page initialization, referred by “init”.

Open your header.php file and add the following snippet, where you want the menu to appear in your theme.

<?php
  wp_nav_menu( array(
       'theme_location' => 'menu-1',
       'menu_id'        => 'primary-menu',
       'depth' => 0,
       'container_class' => 'nav navbar',
  ) );
?>
  • wp_nav_menu is a WordPress function to display the navigation menu.
  • theme_location location at which the menu to be displayed. Works when you register with register_nav_menu.
  • menu_id the ID that is applied to the ul element which forms the menu.
  • depth is used to create nested menus.
  • container_class is the class name used for wrapping the menu container.

Along with these, there are a lot of optimization options to customize. Read more on wordpress codex wp_nav_menu

As you can see in the image below, under the Appearance tab, we do NOT have a Menu option enabled.

Register Menus in WordPress
WordPress dashboard before enabling menu option

After adding the register_nav_menu function we can now see that WordPress will provide a menu option to add menu items.

WordPress dashboard after enabling menu option

Let us know if this was useful or has there been any change. Cheers!. Please share, comment and subscribe.

Voice first gaming experience

Voice first gaming experience

Voice first gaming experience

Article on speech recognition technology for gaming

Gaming has been one of the most successful entertainment industries right when it started in a digital version. Today Gaming is a multi-billion dollar industry. Not only kids but even for adults, the digital game has been their favorite pass-time.

From the era of pre console to modern-day Xbox the history of gaming is quite a remarkable journey. With the evolution of gaming consoles the evolution of game controllers has also evolved from the early gamepad, joystick to keyboard, and touch screen, we have seen it all.

Just when we are in a phase of getting comfortable with touch games another disrupter is waiting to explode and yes,  that’s voice first game or voice-first experience. Amazon is already leading the pack with its powerful Amazon’s Alexa Skills Kit (ASK). You can create games with the help of Alexa Presentation Language.

Also, you can create voice games for android and ios devices as well.

You can build voice-based games for children utilities like quiz, multiple answer questions, faqs, and more.

Few voice-based games built on voice-first experience are:

  • Chicken Scream
  • Big Mouth
  • One Hand Clapping
  • Resonance
  • Full Voice Throttle

Comment below your favorite voice game!

Earn Money with Alexa Developer Rewards in India

Yes! now Amazon Alexa pays for the developers in India to publish their skills in India Alexa Skills Store.  The developers can earn money based on customer engagement, more engagement, more rewards. So, check out Alexa Developer Rewards Program today and start earning.

Let us know how was your experience with development and earning in the comments below.

[ratings]

Topic Cluster vs Keyword Cluster

Topic Cluster vs Keyword Cluster

Topic clusters for SEO is a content marketing strategy to build and organize your content based on a centralized topic. Keyword clustering is a content marketing strategy where we take top to bottom approach to finding a niche keyword and trickle down to the long-tail keywords from those niche words.

Search engines are evolving rapidly over the years and they are getting smart with every update. With the latest updates to the Google search engines, the primary focus for ranking would be content! lots of high-quality content.

Long gone are days of keyword stuffing; new smarter search engines require new techniques of SEO strategy.

What are topic clusters in marketing?

Topic clusters for SEO is a content marketing strategy to build and organize your content based on a centralized specific topic.

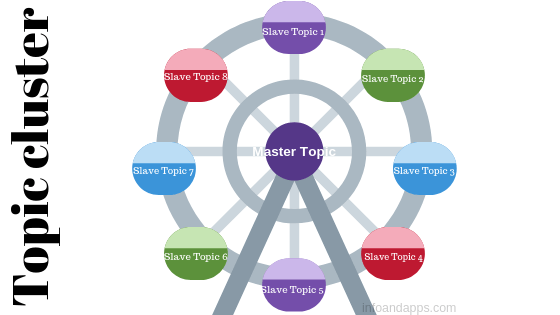
This is something like a master-slave approach.

  • Choose a master topic to work on, this is basically the main and important topic or niche topic that your blog revolves around. In the SEO community, it is called “pillar pages” and the model is called the “topic cluster model“. The slave topics are those that, serve the master topic. The slave topics are supportive structures of the master topic and hence called topic clusters.
  • Each slave topic, in turn, is a master topic and has sub-topics that are slave topics in themselves and are cluster pages.

How do you create a topic cluster?

Say, Digital marketing is our core topic or pillar content. Now, choose the slave topics that are supportive of the master topic. Search engine optimization, Search engine marketing, Social media marketing, Content marketing, etc list of keywords could serve as the slave topics or topic clusters for Digital marketing.

Now, consider Search engine optimization as your master topic and research the slave topics around it. On-page optimization, Offpage optimization, Technical SEO, etc could now act as a slave topic to the master topic of Search engine optimization.

You keep creating the clusters around each master topic, by collecting relevant keyword groups.

You get the idea, right?!

topic cluster example
Topic cluster – Image representation

This technique is quite a powerful content cluster strategy for website and internal link building, not only you are building links back and forth to your web pages, but, also you are providing the reader with the value that is interconnected. This will keep the audience engaged with your site and that’s a good sign for google search engines to reward you.

Focus on building quality links around the topic, let the slave topic pages link to the master topic page alone, avoiding external links. You can provide the external links on the master topic page if necessary. This way you can build good link juice within the site. This is also a good internal link-building technique.

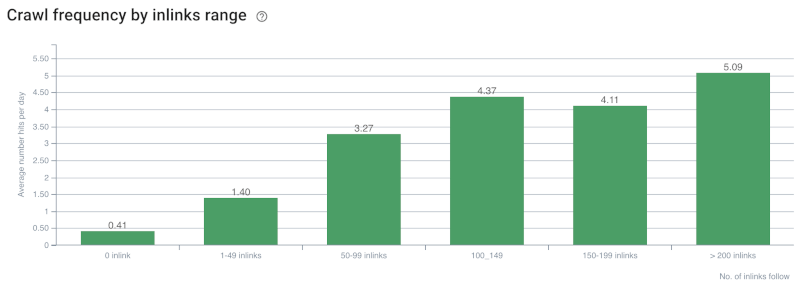
Pages with more internal links pointing to them are crawled more often. Source: OnCrawl.

Why should you consider implementing topic clusters?

  • Improved internal link building, thereby, increasing the chances to rank more pages in SERP.
  • Larger audience engagement within the site, as the topics covered are related to one another.
  • Builds Content authority of your website/Blog.

Cons of a topic cluster

  • Takes a lot of time to restructure the website around the main topic, if you have already established the website.
  • It needs a lot of dedicated resources & time to create content of such a large magnitude.

What is a Keyword clustering technique?

This is an inbound marketing strategy where we take top to bottom approach to finding a niche keyword and trickle down to the long-tail keywords from that niche word.

How to create a keyword cluster?

STEP 1: Do thorough research on what topic you would like to write about. Let’s say you want to write about automobiles.

STEP 2: Choose the master keyword for that topic;  you would want to write on “cars”. Now, “cars” keywords in itself has a wide range of search, around 10M monthly searches.

STEP 3: Which topic in “cars”, would you want to write about?. You can write only about “History of cars”, “Fuel and propulsion technologies“, “Emerging car technologies” etc… Wikipedia can help you here.

STEP 4: Once you decide on these two main keywords, you can start researching furthermore specific keywords to target.

STEP 5: Let us write on “Emerging car technology“, my research on this in the Keyword Planner, gives me more nice keywords:

 automatic braking
aeb braking

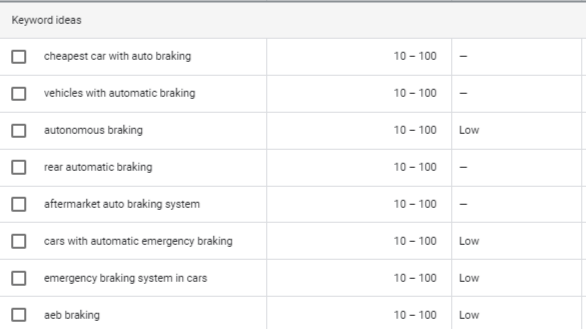
STEP 6: Drill down on “automatic breaking” gives me more keyword ideas.

Keyword ideas from Google Keyword planner

Also, if you notice, the Google keyword planner provides more ideas for your long-tail keywords. Target these keyword groups to build more topics in this niche.

Long-tail keyword ideas for making keyword clusters

Build similar keywords and use them to build your niche topic.

Let’s see a few keyword clustering tools that can help with this

Hubspot has a tool that can provide the topic cluster report https://research.hubspot.com/topic-clusters-seo

Answer the public is another place to search for topic clusters

Hope this was useful, let us know by comments, how you are using these SEO clusters in your writings.

Pin It on Pinterest